Tag Archives: lifestyle

Giftwrapping and illness

Standard

Happy holidays! Sorry I haven’t been posting. I’ve been hit by the cold and haven’t been able to post for some time.  Now that I’m a little better, I can begin blogging again.

Unfortunately, the holidays have once again snuck up on me.  I’m currently swamped with Christmas decorations, lists of things to buy, and presents that need to be wrapped.  And speaking of wrapping… I have a few ideas that will add a little bit more of a personal touch to Christmas presents.

I know that most people prefer not to go over-the-top when it comes to gift-wrapping, and I can be one of those people sometimes.  When I’m not in the mood to deal with all the ribbons and fake bows, I look for the most festive looking wrapping paper I can find and quickly go about wrapping.  If I can’t find that, then I get creative and wrap using whatever paper I can find, from newsprint to plain brown packaging paper.  The nice thing with plain paper is that it leaves room for drawing (which definitely adds a bit of personality to the gift, especially for kids!).  You can always decorate with paints or markers or whatever drawing materials you have.  You can even glue on images and make a collage.  Its the same for newsprint and other types of paper–even Christmas wrapping paper.  One isn’t limited to only ribbons and bows.

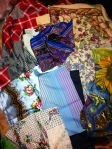
Speaking of ribbons… I find them both lovely and a pain.  They’re great to have because of all the different patterns, but they also add up financially.  And when you have a nice, long list of people to buy presents for (like I have), you’re going to want to save every last penny for those presents.  I recently read an article about someone using lace to decorate their presents.  That sounds pretty fancy (it looked pretty fancy too, if you want to go over the top–which I like to do sometimes), but sometimes people don’t have lace lying around.  This might sound off the wall, but I had an idea inspired by the lace…. one can always use ordinary strips of patterned fabric or textured fabric from old clothes.  Crazy….yes.  But think about it.  If I had a nice plaid strip of fabric, I can easily tie that around a gift for a nice decorative look.  And I wouldn’t be spending 4 or 5 dollars for it.  Now not everyone might have plaid, but that doesn’t mean other patterns aren’t acceptable.  You can use polka dots, stripes, even specific prints like safari themes or cat themes.  And who knows, you can even find a print that might appeal to the person you’re giving the gift to.  Just make sure the fabric is clean and without any holes.  And it would be best to sew the sides so that any loose threads can’t come out (unless that’s what you’re going for).  Bows are the same.  You don’t have to use store-bought ribbons if you have a few nice fabric patterns at home.

That’s all I can blog about for now.  Hope you’re all having a great holiday season! Hopefully by my next post I’ll be back to my full health (it’s already been a week with this cold!)

Countdown to Christmas

Standard

Christmas inspirations-

For those of you that have millions of random buttons, try grouping them together by color to create a small wreath-like ornament for the tree!


Christmas is Here Again…

Standard
Christmas is Here Again…

I know I know… it’s that favorite time of the year! The time when stores and houses come alive with decorations of the holiday season; when people become frantic with gift-giving and house-decorating; when children’s minds begin to wander off into dreams of toys and Santa.  Yes, it’s Christmas and around this time, either you’re hearing its merry sounds on the radio or you’re seeing its merry presence in the mall.  Or you’re like me and you’re beginning to stress out about holiday gift-buying and house-decorating.  I understand that Thanksgiving isn’t even here yet and it’s only mid-November.  However, in my household, the tree and decorations should be up before then.

When it comes to the holidays, usually people overlook the decorative part of the holidays and instead focus on gifts and food.  Yes they can be pricey, but decorations are also just as expensive, if not more so.  Therefore, during the holidays, I’m going to try to blog about ways to make the decorative part of Christmas less stressful on the wallet.  Starting with tip number one:  STAY AWAY FROM THE STORE WHEN BUYING DECORATIONS…ESPECIALLY ORNAMENTS!!!

You can find many Christmas decorations and ornaments at thrift stores and garage sales.  Not only will you find cheap items, but you may find a few unique treasures along the way.  Here are a few of the items I have found at local garage sales:

I know that a lot of people don’t have the time or energy to shop like this, especially with Christmas just around the corner.  It really is something one should do throughout the year.  So the next time you go to a Goodwill or a garage sale, even if it isn’t Christmas yet, you shouldn’t overlook the decorations.  You never know what you might find.  And who knows, it’s bound to be cheaper and more unique than the generic ones you would normally find at a store.  Happy thrifting!


Project- DIY T-shirt Necklace! (part 1)

Standard

I found my next project and it looks so much fun to do! Who could have thought of a t-shirt becoming a beautiful multi-chained necklace?! I certainly haven’t even fathomed the possibility.  Okay…maybe I have thought of a necklace coming from a t-shirt, but not a necklace like this…

So easy! So fun! And I definitely have many used and uninspiring t-shirts lying around the house just waiting to be revamped!

For details on how to do this beautiful number… see the blog A Pretty Penny.  I will definitely try this one out! (hopefully my results will look as awesome as this!)

Scarves, Scarves, Galore!

Standard
Scarves, Scarves, Galore!

Every Halloween, I’m usually scrambling through boxes in my room, searching for a good Halloween costume.  Almost all of the time, I can scrounge up a costume at the last minute.  This year wasn’t one of those times.  Although my gypsy costume wasn’t too shabby, I was missing some key accessories that would have completed my outfit.  Those accessories were scarves.  Over the past couple of years, I have managed to acquire a handful of silk scarves through flea markets, rummage sales, and estate sales.  I couldn’t find them in time for Halloween, however I did discover them the other day next to my desk (go figure).  They were originally meant for something other than a gypsy costume but I can’t imagine what.  Oh well.  I’ll just have to keep them close by just in case an idea hits.

Long Time No See…

Standard
Long Time No See…

Hi everyone! I know its been a loooong time since I last blogged. I’m so very sorry about that.  Things have been kind of crazy in my life and right now I don’t have as much time as I used to have.  All my projects are behind because of work and whenever I have free time, it’s all spent on helping my bf fix up his house.  AHHH!!! Things are just so out of whack right now that it is literally driving me insane!  On a side note, I did manage to scan the internet for inspiration on future endeavors (if time permits).  Here are a few things that inspire me:

Love the fact that this matches the seventies style.

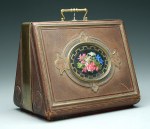
Auctioned off Victorian bag. The shape and flower detail is exquisite!The gorgeousness is in the details!! Vintage Virgin's Victorian briefcase bag

The gorgeousness is in the details!! Vintage Virgin's Victorian briefcase bag

One of the bags that just calls out to me is the briefcase bag that was thrifted by Vintage Virgin.  Everything is just so detailed– the colors, the painting-like graphic image, and the time period of the subject matter.   And the fact that it’s Victorian is a plus plus plus for me (obviously I have a soft spot for all things Victorian hehe).  Now if I can diy it, that would be interesting for sure.

Vegas and Makeup Bags

Standard
Vegas and Makeup Bags

So a funny thing happened on the way to Vegas.  I had my bags packed and was rolling my suitcase down the driveway to my boyfriend’s car.  Somehow, it ended up running over my neighbor’s dog’s ___ (you can fill in the blank).  After some attempts to clean it, I had to switch it for another bag and then rush to transfer all of my clothes.  Now that I’ve come back from Vegas, I now have to tackle that oh-so-pleasant task of cleaning dog poop from the wheel of my luggage (something I have to attempt tomorrow since I have work in a few hours).

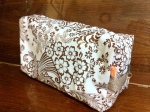
Bags are something that is essential to a woman’s daily life.  We women have so many uses for bags, and so many bags for specific reasons.  There’s my poop-stained travel luggage (bag), makeup bags, purses, wallets, pet carriers, satchels, bags for toiletries, briefcases, etc.  They come in all shapes, colors, textures….  There’s just so many to choose from!  Lately I’ve been obsessed with vinyl and oil cloth, and I bought a bunch of it to experiment with.  Here are two bags I created using vinyl and oil cloth:


If only my luggage was made out of a nice waterproof plastic (like these two makeup bags)…. It would make my life soooo much easier!

A Rice Bag’s Evolution Into a Eco-Friendly Shopping Tote!

Standard
A Rice Bag’s Evolution Into a Eco-Friendly Shopping Tote!

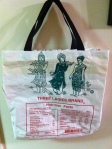
In my previous post, “Repurposed Bags”, I introduced my plans for creating a bag out of a used rice bag.  Thanks to some helpful instructions from a bag book I bought not too long ago (Simply Sublime Bags, by Jodi Kahn); I was able to create this useful little tote.  This handy tote was created using a regular, used, plastic rice bag.  Everything is mostly the same, except for some slight differences in the construction.  Thanks to Jodi’s advice, I “stitched” together the bottom of the bag—as well as the handles—with a stapler.  Then I had the staples covered by taping the top and bottom sections of the bag.  NOTE:  In Jodi’s instructions, the bag’s bottom is pretty much created by folding the fabric in half, thus eliminating the need to sew up a bottom.  Since my bag already has a bottom and the sides stitched together, all I needed to add to make it a tote were the handles.  However, the rice bag I happened to be using for this project had loose stitching on the bottom.  So I ended up cutting the seam open and re-stitching the bottom using the staple method in Jodi’s book.  To finish up the stitching, I covered the staples in duck tape (in the same color as the plastic) to prevent any scratches from staples or stitching coming undone.  Voila! A rice bag recycled into a grocery tote using Jodi Kahn’s Original No-sew Tote instructions.

DIY Button Jewelry

Standard
DIY Button Jewelry

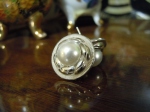
I finally got around to creating some jewelry (one of many projects that were left on the back-burner).  Time to check something off the list! (hehe)  I haven’t done jewelry making in a long while, mainly because of the fact that the hobby was very different from what I was used to doing, not to mention the prices of supplies were pretty hefty.  I didn’t want to spend my money on something I was only going to do once and then discard later because of poor craftsmanship.  However, that all changed when I read and saw a post about “button jewelry”.  Button jewelry? Regular, tossed-and-forgotten buttons as jewelry? Buttons as a possible trendy, fashionable, what-have-you jewelry?  What the heck, I thought.  I had to try it out.  After all, I had jars full of buttons obtained through countless garage sales, and it would be great to seem them all used.

After a bit of DIY jewelry sleuthing, I found a couple of places with tutorials on how to create button jewelry.  And the materials needed were simple to find:  Jewelry glue, Earring posts (with the flat heads for attaching to the buttons), rings with flat heads (again for attaching to the buttons), pliers (or wire cutters), and BUTTONS of various sizes (amount can vary depending on how many unique earrings/rings you want!)

BUTTON EARRINGS:  Here are the steps to making button earrings:

  1.  Using the pliers (or wire cutters), remove the thread loops from the backs of the buttons (so that the back is flat enough to glue to the earring post).
  2. With the back of the button facing up, squeeze a little bit of glue onto the part of the button that you would like to attach to the earring post.
  3. Attach the earring post’s flat head to the glued surface of the button.
  4. Lightly squeeze both the bost and button together using the pliers for a few seconds. (NOTE: YOU DON’T HAVE TO DO THIS.  I usually do this because I feel like the glue adheres to both surfaces faster.  Some glues may require this, but some might not.  It really depends on the glue itself)
  5. Leave the earring for a few hours to dry and bond completely.
  6. WEAR IT!

For BUTTON RINGS, it’s pretty much the same steps (steps 1-2).  After squeezing glue onto the button’s surface, you then attach the flat head of the ring to the button.  Then move on to step 4 (clamping the surfaces together using the pliers) and then step 5 (leaving the ring to bond and dry completely).  See? Pretty much the same routine, just using the ring as the base instead of an earring post.  This way anyone can have both beautiful and one-of-a-kind button rings and earrings.

When making my earrings and buttons, I pretty much followed the same format, except I combined buttons to make the designs more interesting.  Thanks to my giant jar of buttons, I had a wide variety of buttons to choose from.  So I chose what I felt looked good together and glued them together before glueing the button to the earring post/ring.  The designs really are endless if one considers how many buttons there are out there.


Unexpected Discoveries

Standard

I apologize for failing to post.  I had just arrived from a mini-vacation trip to Solvang and Santa Barbara.  Although it was short, it was a much needed break away from the hum-drum of life.  And it wasn’t as if I spent all that time lazying around.  My sister, boyfriend, and I scoured the city for delicious treats and unique, village shops.  And during our exploration of the small European village, my sister was able to spot a hidden gem amongst all the touristy places.  We headed to what seemed like an unoccupied plaza.  To our surprise, the plaza’s entire lower section was a giant fabric store.  It was the lower floor, so it was hidden from view.  I guess what happened was that owners took over all of the stores in the lower section and combined them all into one discount fabric business.  As we got closer to the store, we noticed that the prices were really cheap! It was something like 99 cents per yard, 1 cent per button, 5 cents per zipper, and 10 cents per belt.  I only had about 10 dollars and usually with 10 dollars you can only buy a few things.  Thanks to this place, I was able to buy 3 yards of fabric, 10 belts, 25 zippers, and 40 buttons! All for under $10!  The only other place I’ve seen such great prices for fabric was at a garage sale (the lady was a fabric shop owner and needed to get rid of excess fabric).  I’m definitely coming back here! The drive is pretty long (about 3-4 hours), but it’s definitely worth checking out!

Discounted goodies!